Showing posts with label cheese. Show all posts

Wednesday, February 24, 2016

Black Pepper & Cherry Savory Crackers

These tender crackers are for soft goat cheeses and tubs of homemade (or farm stand) ricotta cheese.  Black pepper and dried cherry feature here but feel free to swap in chopped rosemary and dried figs or walnuts and dates.  Try serving the crackers with drier cheeses too--Manchego comes to mind.

Black Pepper & Cherry Savory Crackers
Yield 2 dozen crackers

Ingredients
½ cup unsalted butter (1 stick)
¼ teaspoon salt
1/2-1 teaspoon freshly ground black pepper
1 ¼ cups flour
¼ cup brown sugar
1 large egg
½ cup dried fruit, chopped(cherries, cranberries, nectarines,
¼ sliced almonds, lightly toasted

Method

  1. Place the butter in a large mixing bowl and use an electric beater to mix until fluffy.  
  2. Add salt, pepper and brown sugar and continue to beat until sugar has melded with butter.  
  3. Add flour as you continue to beat so that the flour is nicely coated in butter mixture.  Do this in three batches but work quickly so you do not over work the flour and create a tough cracker.
  4. Add egg and mix in.  
  5. Use a large spoon to mix in dried fruit, nuts and any extra flavorings (herbs, citrus zest, etc).  
  6. Using your hands, form the dough into a log.  Wrap in plastic wrap and refrigerate at least one hour or overnight.  
  7. Once chilled, preheat oven to 350˚F.  
  8. Slice dough in ¼ inch slices and lay on a parchment lined baking sheet.  
  9. Bake 10 minutes until crackers are just browning on the bottom.  
  10. Remove to a cookie rack to cool.  Crackers will crisp as they cool.  Store in an airtight container. 


Tuesday, December 22, 2015

Apple & Pear Sauté

Slivers of unpeeled pear and apple skin add a festive note.
What side can I bring?  Add a recent potluck, our hostess added sauteed apples to a group dinner whose center piece was pulled port.  It was a hit that's inspired me to create a simple and fast Apple & Pear Sauté to accompany all kinds of pork over the holidays.  The key is to create a savory bridge from the fruit to the meat.

Use firm apples for cooking like Macoun, Winesap, Pink Lady or  Granny Smith varieties.  Pears tend to be less firm than apples so you will put them in the pan second but check your pears and if they are quite firm, add all the fruit at once.  Bosc pears are generally a firm pear and you can also use Anjou or Bartletts.  At this time of year, we are often the lucky recipients of sweet Comice pears which are  terrific paired with a tart apple variety.

Herbs like thyme and a little balsamic vinegar provide the savory bridge.  Try to use fresh herbs in this dish.  If you do not have thyme, try a small amount of fresh sage. Oregano would also work.  A drop of honey and butter bring it all together. 

Apple & Pear Sauté
Serves 4

Ingredients
1 apple, partly peeled, cored and sliced
1 pear,  partly peeled, cored and sliced
1 tablespoon unsalted butter
1 teaspoon balsamic vinegar
1 teaspoon honey
salt & pepper
1 tablespoon fresh thyme

Method
  1. While your roast rests, melt butter in a wide skillet over medium heat.  Add the apples and cook until they are beginning to soften. Gently stir with a wide spatula.  This will take 3-5 minutes.
  2. Add the pears and continue to cook, stirring gently to turn fruit.
  3. Add balsamic vinegar, honey, salt and pepper.  Stir to combine.
  4. Lower the temperature and cover the skillet.  Cook for a few minutes more, until fruit is soft but not breaking down into small pieces.  The slices should keep their shape.  
  5. Just before serving toss in fresh thyme.  
 Serve immediately as a side to pork dishes.  

Any leftovers of this quick fruit sauté pairs nicely with cheese.  Serve
at room temperature in a small bowl next to the cheese platter.

Saturday, November 21, 2015

Filo-Wrapped Mozzarella Sticks

Filo-Wrapped Mozzarella Sticks are a quick and impressive hot appetizer to pass around or place on top of a simple green salad.  By wrapping each stick of cheese in prosciutto, you get extra flavor and prevent the cheese from oozing out before the filo is browned.  The saltiness of the Prociutto ham is nicely balanced by the sweetness of the quince paste.  If you cannot find quince paste, any good quality jam or an apple butter would work well.  Experiment with fig or apricot jam.

Filo-Wrapped Mozzarella Sticks
Makes 16 appetizers, recipe easily doubled

Ingredients
1/2 pound low-moisture mozzarella
8 slices prosciutto, cut in half
1/4 cup quince paste, apple butter or other not to sweet jam
16 sheets filo dough (wrapped well or covered)
1/4 cup melted butter

Method
  1. Preheat oven to 400˚F.  Line a baking sheet with parchment paper or lightly oil the sheet.
  2.  Cut mozzarella cheese into 16 long sticks.  Lay each on a slice of prosciutto.  Place a small amount of quince paste, about half a teaspoon, along the cheese on the ham.  
  3. Start rolling the cheese in the ham.  As you roll, the quince paste will spread along the roll.
  4. Open the filo and follow package directions about keeping the sheets moist as you work.  
  5. Take a single sheet of filo and lay it on a flat surface. Use a pastry brush to brush melted butter over entire sheet.  Do not worry about small tears in the filo.  It is more forgiving than it appears.
  6. Place a wrapped piece of cheese at the bottom center of the buttered filo sheet.  Begin to roll the cheese stick until wrapped twice.  Stop rolling and fold in the sides.  Butter the top layer of filo and continue rolling until the cheeses is completely packaged.
  7. Place each wrapped cheese stick on prepared baking sheet. You can place sitcks quite close to each other but not touching.  Give each sitck a final brush of butter.
  8. Bake for 12-15 minutes until lightly browned.  Let sticks rest 5 minutes before serving to allow them to firm up a little. 
Filo sticks may be preapred in advance and frozen.  No need to deforst; add 3-5 minutes of baking time.

Do not use fresh mozzarella in this recipe. The type of cheese used here is readily available at supermarkets and comes in whole milk and skim milk varieties.  You can also use a smoked mozzarella for this recipe.

Thursday, April 2, 2015

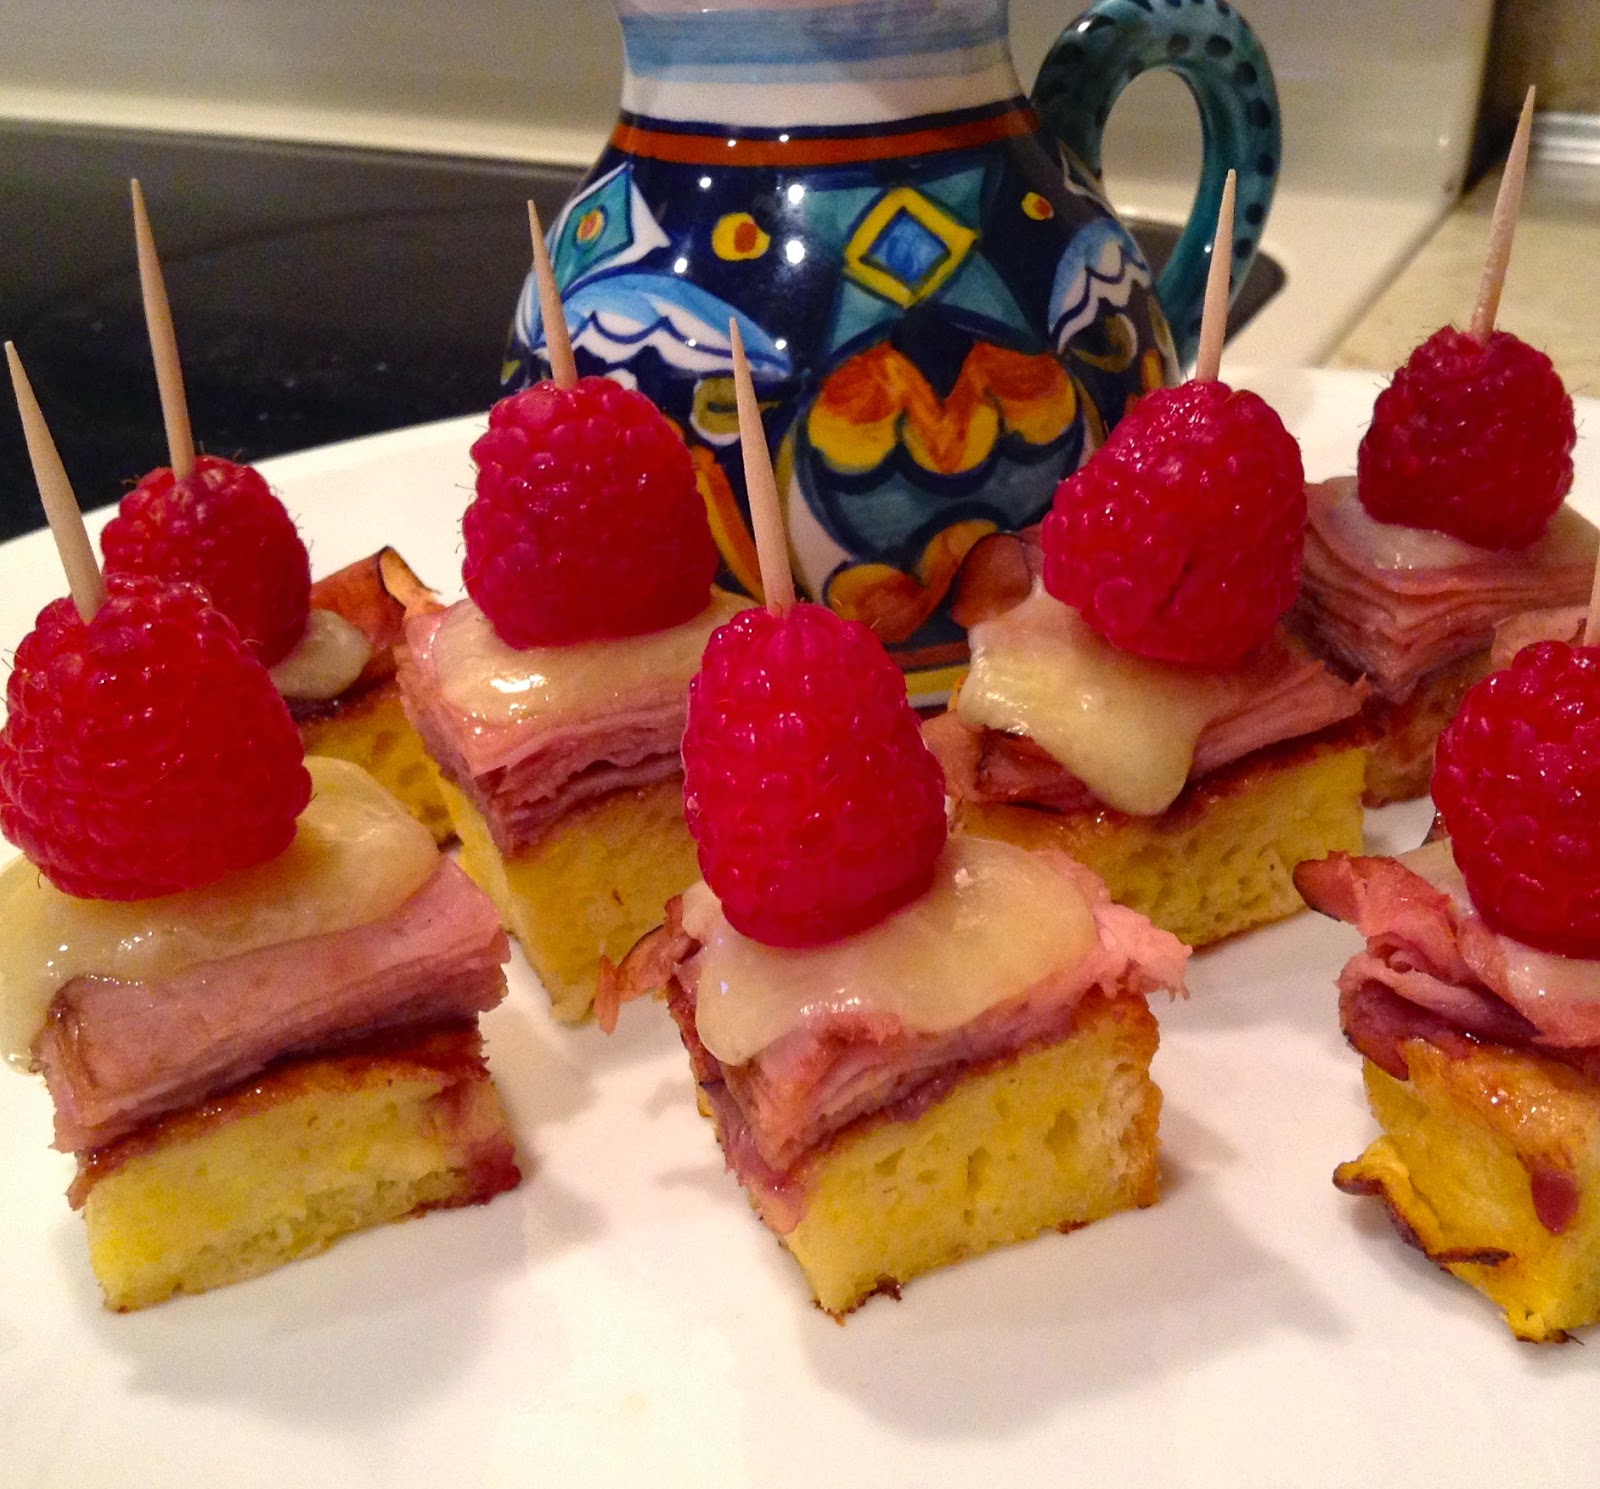
Little Monties on Brioche French Toast


Turn a Monte Christo sandwich into an Easter or Spring brunch bite.  The classic, shown here, uses our large batch brioche French toast that can be made ahead and frozen.  Get the french toast recipe here.

Slather some rasberry or strawberry jam  onto warmed french toast.  Stack ham slices then swiss cheese on top.   Cut into bite-sized squares and place on a cookie sheet.  Broil to melt the cheese and serve with toothpicks skewered with a fresh raspberry. Serve with warm maple syrup.

Our classic Little Monites feature thinly sliced ham.  To make a vegetaian version, spread french toast with cream cheese, then the jam.  Skip the ham and keep the swiss cheese or try a smoked gouda to approximate the ham and cheese combo.  Served with maple syrup, this version will attract meat lovers too so set some aside for any vegetarians arriving a little late!

Sunday, June 22, 2014

Picnic Zucchini Roll Ups

This is the season for picnics, boating, fireworks shows and dining au pleine aire.  Finger foods make the easiest fare.  Zucchini Roll Ups can cover a lot of ground as a salad, side or even dip and crudité. 

If you are planning an outing these are best made all or in part a day ahead.  They keep well and prevent last minute crunch time in the kitchen. 

Zucchini Roll Ups

18-20 rolls

Ingredients
1 medium-large zucchini
1 tablespoon olive oil
salt & pepper
2 ounces cream cheese, room temperature so it mixes and spreads easily
1/3 cup ricotta cheese
1 tablespoon each fresh, chopped herbs: mint, parsley, basil
Optional filler: roasted red pepper strips, steamed asparagus, julienned carrot, etc
18-20 pitted olives
18-20 cherry or grape tomatoes
18-20 toothpicks

Method
  1. Slice zucchini on a mandolin or vegetable peeler into wafer thin slices.  You may cut the zucchini in half cross wise before slicing or cut the slices in half once cut, whichever is easier for you and your tools.  Aim to end up with 18 zucchini slice halves. 
  2. Brush slice with olive oil, salt and pepper each slice.  Place slices on a cookie sheet and broil 1-2 minutes per side.  Remove zucchini when they are just browning and still flexible.  
  3. Stack 4-5 slices and roll each slice.  Leave to cool. (You can continue at this point or refrigerate zucchini overnight and finish recipe the following day.)  
  4. While zucchini cools, prepare filling. Mix together cream cheese, ricotta and herbs.  Add salt and pepper to taste.  
  5. Finish by unrolling a stack of zucchini slices.  Place slices on a paper towel and turn over to remove a bit of olive oil.  This will make spreading the cheese mixture easier.  
  6. Using a spoon and butter knife or two spoons, dab a spoonful of cheese mixture on each slice and spread to cover slice completely with cheese.  
  7. If you are using a filler, like a piece of roasted red pepper, lay it on the cheese, perpendicular to the zucchini slice.  Roll and secure with a toothpick.  Add an olive to one end and a tomato to the other end of the toothpick to secure zucchini roll in place.  
  8. Store rolls in an airtight container and keep chilled until serving. 

Sunday, March 30, 2014

Strawberry Cream Cheese Panini

My mother used to make us cream cheese and strawberry jam sandwiches.   Made with tightly crumbed white bread, with the crusts cut off and perfectly square,  they added elegance to any child's tea party.  All grown up and more rustic, these strawberry and cream cheese panini provide the same flavorful delight plus a little whiff of spring during March's slow melt into sunnier days.

The filling in our panini is made with frozen strawberries that have been defrosted and macerated with a little lemon juice and cinnamon. Be sure to look for unsweetened strawberries.  You can always add a little sugar or honey if your strawberries are not as sweet as you'd like.  If you are seeing fresh strawberries that have some flavor, go ahead and use those.  The cream cheese is flavored with lemon zest.  A good quality (or homemade) strawberry jam is the only other essential ingredient.

For the bread, use a fairly plain loaf that will not compete with the filling.  Sliced plain white bread is fine and so is brioche, challah, a country loaf or french bread sliced on the diagonal.

We think of these as a daytime snack or breakfast fare, but if you are serving them after dinner try blending a little liquor into the cream cheese or the jam.  If you have some Chambord, creme de cassis or Grand Marnier you can highlight the fruit notes in the sandwich or try something more unusual but complimentary like Drambuie or Amaretto.  You won't need much, just a teaspoon or two.

Strawberry Cream Cheese Panini
Makes 2 sandwiches

Ingredients
3 ounces cream cheese
1 lemon
1/2 cup frozen strawberries
pinch cinnamon
2 tablespoons strawberry jam
4 slices bread
1 tablespoon butter (if using skillet method or panini press allows)

Method
  1. Place cream cheese in a small bowl.  Zest the lemon and mix into the cream cheese.  Set aside. 
  2. Defrost strawberries and give them a rough chop. (You can defrost strawberries quickly in a microwave.  Use half power for 2-3 minutes.)  
  3. Mix in juice of quarter of the lemon (about 2 teaspoons) and a good pinch of cinnamon.  Set aside while you prepare the bread slices.  
  4. If you are using a panini press, preheat it now.
If using a pannini press, follow manufacturer's directions for oiling or not oiling the surface of the bread....
  • Slice the defrosted strawberries and taste one.  Sprinkle a teeny, tiny amount of sugar on them if needed.  Set aside while you prepare the bread. 
  • Spread some good quality strawberry jam on one side; the flavored cream cheese on the other.  Spoon the sliced strawberries over the jam side and cover with the cream cheese side.    
  • Place the cream cheese side down and close the press. Most will beep when the pannini is ready.  Remove and cut in half or in quarters to serve. 

If using a skillet....
  • Place the pan over medium heat. Slice the defrosted strawberries and taste one.  Sprinkle a teeny, tiny amount of sugar on them if needed.  Set aside while you prepare the bread. 
  • Spread some good quality strawberry jam on one side; the flavored cream cheese on the other.  Spoon the sliced strawberries over the jam side and cover with the cream cheese side.  
  • Brush the top with some melted or softened butter.  Place the cream cheese (buttered) side down and cook until browned on that side.  
  • Lightly butter the top (jam side) while the flip side grills.  Flip and cook until browned on the jam side.  Remove and cut in half or in quarters and enjoy. 

Serving suggestion: These really are terrific on their own but if you know someone who loves chocolate, a little bowl of melted dark chocoalte or warm ganache can be served along side for dipping or drizzling.

Sunday, November 17, 2013

Ploughman's Party

Molasses and vinegar flavored Branston pickle and pickled onions accompany a British cheese board.
Thanksgiving success is often a matter of keeping excess kitchen activity low, particularly during the hours before and even the night before the big meal.  Take inspiration from a meal that doesn't require much, if any, kitchen equipment or cooking time-- the very English Ploughman's Lunch-- for an easy pre-dinner cocktail hour.   Everything is laid out cold (or room temperature) so it can be set up quickly and does not interfere with any wild goings-on in the kitchen.
-->It can even stand in for dinner one night (maybe the night before Thanksgiving as relatives arrive) or as a Super Bowl theme.
Every culture has a bread and cheese meal, often served with a fruit confection like Membrillo (quince paste) with Manchego in Spain or fig jam with Italy's Pecorino Romano cheese.  Ploughman's Lunch is served in pubs across the British Isles and includes local cheese, slabs of hearty bread and pickled vegetables epitomized by Branston Pickle.  This jarred chutney, a combination of root and winter vegetables preserved in a molasses and vinegar pickling medium, is easy to find in the U.S.  It's strong, piquant flavor stands up beautifully to aged cheddars.

When I was a student in England I discovered the ploughman's lunch served with a pint of bitter, the England's pale ale and generally a lower alcohol choice.  Cider (hard or soft) and beer are natural partners. Fill a cooler or an elegant ice bucket alongside your Ploughman's cheese spread and let people serve themselves.

Sometimes the pub special included a really generous helping of pickled cauliflower florets, pearl onions and gherkins.   A little ham, pate or cooked and iced shrimp can augment your table to add a little more substance if the numbers are large or if this is the main meal on the night before Thanksgiving. When we enjoy a Ploughman's Lunch it accompanies a fall soup like pureed butternut squash and roasted pear soup.

While it is easy to picture an 18th century farmhand sitting in the shade of the plough enjoying his midday meal of cheese, bread and beer, the pub version was not popular in the U.K. until the 1950s. A serious post-war effort by England's Cheese Bureau intended to reignite their industry after intense rationing promoted the Ploughman's Lunch into such a classic that even today tourists expect to see it on pub menus.

Here in America,  it is easy to find a few classic English cheeses and pickles and chutneys to accompany.  If you cannot find Brandston pickle, try Major Grey's Chutney.  The American pepper jelly would also be welcome at this meal.  When I was shopping for cheeses I asked the counter man if there was anything else besides Cheddar and Stilton I could include among English cheeses.  I had just picked up a wedge of Wensleydale from Yorkshire speckled with cranberries which fit the season perfectly.

We went over to the Cheddar section where I selected a pale yellow Seaside Cheddar that had aged for 14 months.   As luck would have it, an Englishman was there too.  I explained my plan and when asked about the cranberries in the Wensleydale, he assured me this was enjoyed on both sides of the pond not just a gimmick sent to us for the season. I'm glad I saw it.  Cranberry Wensleydale is my cheese find of the season and will show up right through New Year's.  Wensleydale is mild with honey undertones, a nice foil to tart cranberries. 

He also intimated that though its nice to have a range of cheeses, if you can only find or afford one cheese, make it cheddar, English or American.  As he put it, "It wouldn't be a ploughmans without Cheddar."

Wishing you and yours a Happy Thanksgiving with all the sanity you can handle. 

Monday, April 15, 2013

Roasted Zucchini Feta Salad

Some occasions like spring birthday parties and wedding showers need a side dish with a little sex appeal.  It should be easy and bridge the seasons since the temperature can really roam at this time of year.

Roasted Zucchini Salas completes the assignment.  It can be served warm or cold, can be prepared in advance or served up straight out of the oven and it holds beautifully.  It looks and tastes pretty special too.


Roasted Zucchini Feta Salad
Serves 4, recipe can be doubled

Ingredients
4 medium sized zucchini
2 tablespoons olive oil
salt & pepper
4 heaping tablespoons crumbled feta cheese (low fat is fine)
1/4 cup fresh herbs, roughly chopped (dill, mint, parsley, thyme)

Method
  1. Preheat oven to 450˚F.  
  2. Lightly oil a sheet pan.  Canola oil works well here.  
  3. Slice the zucchini on a extreme angle to get nice wide angled strips.  
  4. Lay zucchini slices on oiled and and turn to coat lightly with oil. Sprinkle salt and pepper on both sides. 
  5. Roast Zucchini at 450˚F for 15-20 minutes, turning once.  The zucchini will be crisp if you have sliced it in thin slices and  melting-tender if you have sliced it into thicker (1/2 inch strips).  Both are excellent.  
  6. Serve zucchini with crumbed feta cheese and chopped herbs like dill and mint.  Drizzle with a little oil or lemon juice- your choice.
Bonus: these roasted treats can be quickly turned into little hors d'ouevres served on thinly sliced baguettes.  

Sunday, September 23, 2012

Goat Cheese Turkey Burgers

The name of this burger is pretty much the recipe too.  So simple, the grown up complexity will surprise you.  A real star of a fast meal. 

The main complaint about low fat turkey burgers is that they can be dry.  You have to add lots of other things – grains, nuts, oils-- to get a moist burger.  By that point, you’ve added so many calories and fat and are wondering what the effort is for.

These burgers are super moist and still use 99% fat free ground turkey.  The goat cheese—about a tablespoon of a soft variety in each—adds extra protein and is the not-so-secret ingredient to a juicy burger. 

Goat Cheese Turkey Burgers
Makes 4

Ingredients
1 pound lean ground turkey
4 tablespoons soft goat cheese (or reduced fat cream cheese)
flour to dust
1 T vegetable oil

Method
  1. Sprinkle flour on a flat dinner plate.  
  2. In a medium bowl, use a fork to mix the turkey with the goat cheese.  You can also use your very clean fingers.  
  3. Form 4 patties.  They will be very moist and sticky until coated with flour.  Wet your hands with cool water to prevent meat from sticking to your fingers.  Place each patty on the flour-coated plate.  Turn the patty once to dust with flour and prevent sticking when pan fried. At this stage, the burgers can be cooked at once or covered and refrigerated for several hours.  
  4. To cook, heat oil in a wide skillet over medium-high heat.  When oil is hot, place patties in skillet and lower heat to medium.  Cook 3 minutes on each side, until nicely browned and cooked to 170˚F. 
These burgers tastes great plain.  The goat cheese pervades the meat and provides interest in every bite.  If you like adornment, play around with flavored mustards, fruit salsas or red pepper coulis.

Goat cheese turkey burgers store well and make a great lunch the next day tucked in a pita with salad. 

Variations:  Goat cheese coated with herbs or black pepper is delicious on its own.  If you like these, try using one of these varieties or add a favorite herb (about 1/4 teaspoon dried) when you mix the cheese and meat together.

Saturday, August 18, 2012

Ricotta Salata on the Side

When fresh sheep’s milk cheese is salted, pressed and dried, it forms a chalk white sliceable block with a subtle creamy/salty flavor called ricotta salata.  Don’t mistake this for pressed and salted ricotta; the name in Italian refers to a process of making cheese—recooking and salting—rather than the base cheese it is made from. 

But don’t get caught up too much in the name’s true derivation.  It’s pleasant sponginess and fresh milk taste will remind you of the best fresh ricottas, if you’ve been lucky enough to have a homemade or deli-made version.  Ricotta Salata goes in many of the places feta cheese or Mexican cotija can go like the salad below.  It is also nice to crumble over pasta dishes and compliments grilled or roasted vegetables.  I recently found sliced wedges of it drizzled with a little honey and placed alongside some grilled peaches in an elegant dessert course. 

Cucumber Mint Ricotta Salata Salad
Ingredients
2 cucumbers, peeled, seeded and cut in chunks
2/3 cup cubed ricotta salata
5-6 fresh mint leaves, sliced or torn
1 tablespoon extra virgin olive oil
juice of 1/2 lemon
salt and pepper to taste

Method
  1. Toss the cucumbers, cheese and mint leaves together in a small bowl.  
  2. Whisk together olive oil, lemon juice, salt and pepper together in a small bowl and pour over salad.  Toss to just combine dressing.  
  3. Salad can be made up to an hour ahead of serving. 

Cucumber Mint Ricotta Salata Salad is a great side for grilled steak on summer nights.  Since it can be made ahead of time, the cook in charge of side dishes can get out of the kitchen onto the patio with everyone else. 

Sunday, July 8, 2012

Fontina Asparagus Pizza

My friend Lee knows I make my own pizza dough. He gave me a ball of frozen dough that he assured me would be just as light and all natural-- the same pure ingredients I use.  His came from a business associate who supplies dough to pizzerias wholesale.  Lucky pizzerias.  Prep space is limited in many restaurants and finding a quality supplier that can save the owner time and money (and space) is a good for all sides of business. 

I also saved time with the high quality frozen dough.  It defrosted leisurely in its package in the refrigerator and over 3 days went from a solid softball to a foamy square pushing into the sides of its bag.

We've had hot, hot days so turning on the oven to heat a pizza stone was out of the question.  Even taking the time to really stretch out the dough seemed too much effort in the steamy heat.  A free form pizza baked over a bed of farina (instead of cornmeal) on an extra thin cookie sheet was all that could be managed and thanks to the relaxed rise of the pizza dough, it came out perfectly. It had a crispy light crust yet was still moist and deliciously yeasty inside.  The dough was a perfect foil to the cheese and asparagus.  Omitting the sauce made for a lighter meal and let us taste and appreciate each ingredient. 

We topped our pizza with quickly steamed, then butter & olive oil-sauteed asparagus over fontina cheese.  X's formed with anchovies provided a salty balance.  If you don't love anchovies, accent this sophisticated pizza with crisped bacon, it's cousin pancetta or top with good quality prosciutto.  (If using prosciutto, wait until the pizza is out of the oven.) For an all vegetable pizza, slice a few oil cured olives and scatter over randomly.

Bake the pizza in a preheated 400˚F oven for 12-14 minutes until the dough is puffed up a bit and the bottom is light brown and sturdy.  Let the pizza rest a moment before slicing.


NOTE: High quality pizza dough has few ingredients, just like what you would put together with flour, water, salt and olive oil.  The trick is giving your dough time to rise. Be patient and go for a slow rise under refrigerated conditions in a loosely secured plastic bag to allow for expansion.  A freshly made dough will rise in about 8-12 hours and can hold for a day.  Let a frozen dough come to the ready over three days.


Monday, April 30, 2012

Baked Jalepeño Poppers

I thought I’d miss the fried version of jalapeño poppers but I think I like these better.  The baked topping has all the crunch I crave in a bar snack and baking them means I can make lots and reheat them.  They even freeze well after the first bake.

We make two basic fillings- one with veggie cream cheese mixed with grated cheddar and the other with equal parts soft goat cheese and cream cheese topped with crispy bacon pieces.  Try the goat cheese version using a nice aged goat cheese like Pico or le Boucheron to pass these around at a grown up cocktail party like a wedding rehearsal dinner.  Add the cheddar version to a Cinco de Mayo celebration.

Here’s the basic recipe for 12 jalapeño poppers using 6 whole jalapeños.  The recipe can be doubled and tripled. 

Baked Jalapeño Poppers
Ingredients
6 jalapeño peppers, split lengthwise
3 oz cream cheese, softened
3 oz soft goat cheese (try an aged version, rind and all)
2 strips cooked bacon, chopped in large pieces
1 egg + 1 tablespoon water
1/4 cup flour + salt and pepper
1/2 cup bread crumbs

Method
  1. Preheat oven to 400˚F.  
  2. Prepare peppers.  Seed and de-vein the jalapeño halves.  The curve of a serrated grapefruit knife makes this easy or use a regular serrated knife.   
  3. Place pepper halves in a lightly oiled metal baking dish (like a cake pan or 8X8 brownie pan).  Bake at 400˚F for 10 minutes while preparing filling.  
  4. Mix cream cheese and goat cheese together with a fork.  Turn off oven and remove peppers from oven.  Allow peppers to cool a few minutes so they are easy to handle.  When cool, fill each pepper with about 1/2 ounce filling (a little under a tablespoon) and press a few bacon pieces into each.  
  5. Cover and refrigerate for about an hour (or overnight).  Cooling stuffed jalapeños makes easier breading them before baking easier.   If you are in a hurry, skip this step.  A touch messier but it won’t ruin the final result. 
  6. Preheat oven to 400˚F.  
  7. To bread chilled peppers, set out three small dishes.  Place flour mixture in the first, egg/water mixture in the second and bread crumbs in the third.  Have your metal baking pan ready (lightly oiled).  
  8. Dip the filled side of each pepper into flour, egg and then bread crumbs.  Place in baking pan.  
  9. Bake at 400˚F for 20 minutes, checking halfway through to make sure filling is not oozing out of peppers.  Poppers are ready when top is crisp and cheese is soft and melty. 

Alternate filling:
4 ounces plain or veggie cream cheese plus 2 ounces grated cheddar or Monterey jack cheese.  Bacon optional.

Handling Hot Peppers
The oils from cutting and prepared any hot pepper can linger on your hands and give you a jolt if you rub an eye hours later if you do not wash (not rinse) your hands including nail beds with hot soapy water after you are finished prepping them.  Once roasted, jalapeños retain very little volatile oil and handling requires less concern.  If you are very sensitive, wear food safe gloves when working with peppers.

Wednesday, October 26, 2011

Savory Corn and Cheese Pudding

I would almost call this spoon bread due to the addition of a little corn meal to the batter. These are light and fluffy while delivering a really satisfying cheese flavor.  A nice side dish for poultry, these puddings are also perfect for a simple lunch or dinner with a salad or soup.

You may only think of corn pudding at the holidays but don’t wait until Thanksgiving to make these.  They come together so fast that they are ideal for a weeknight dinner.  They are a good substitute for potatoes.  If you don’t have either mozzarella or goat cheese in the house, you can use an equal amount of cream cheese.  And if you are already planning your Thanksgiving menu, this is a terrific vegetarian main dish accompanied by or spooned into 1/2 roasted acorn squash*. 

Savory Corn and Cheese Pudding
Serves 4

Ingredients
1 1/2 cups corn (fresh, frozen or 14-oz can low sodium corn)
1 egg
1/2 cup cream or whole milk
1/2 cup cheddar cheese, grated
3 ounces mozzarella or goat cheese,  diced (or a mixture)
1/4 cup fine cornmeal mixed with 1/2 teaspoon baking powder
dash cayenne (more for spice loving families)
1/2 teaspoon honey
salt and pepper
2 tablespoons freshly grated Parmesan cheese

Method
  1. Preheat oven to 375˚F.  Spray four 1/2 cup ramekins or one larger baking vessel with oil.  
  2. Puddings will be baked in a water bath (bain marie) by placing the ramekins in a high-sided balking dish filled about 3/4 inch with hot water.  Begin bain maire by boiling 2 cups water over medium heat while you prepare puddings. 
  3. Drain corn if using canned corn. Reserve 1/2 cup corn and the Parmesan cheese.  
  4. Place remaining ingredients in a small food processor or blender.  Blend together to break down corn and incorporate the cheese. 
  5. Add reserved 1/2 cup corn and blend briefly just to incorporate into batter.  
  6. Spoon into prepared ramekins of baking dish.  Sprinkle with grated Parmesan cheese.  
  7. Place puddings in the baking pan.  Place pan in oven, then fill 3/4 inch high with water to surround baking vessels.  To prevent spilled water, it is often easier to pour the water in once the baking pan is in the oven with the rack pulled out a bit.  Then slowly slide the rack back into the oven and bake.  (You can also add water to the pan then transfer it to the oven with steady hands.)  
  8. Bake puddings 20-30 minutes, until centers are set.  Serve immediately.
Corn and Cheese Puddings keep well covered in the refrigerator for 1-2 days

*For roasted acorn squash, rub halved squash interiors with a bit of olive, salt and pepper and roast flesh side down for 20 minutes at 375˚F.  Turn over and continue roasting until fork tender, another 15-20 minutes.  To sweeten,  add a few drops of maple syrup or some brown sugar with a dab of butter into cavity after turning. 

Tip: If you are using canned corn, a 14 ounce can drained is just a little over 1 1/2 cups.  Use it all.

Friday, September 30, 2011

Egg Cups To Go

Somewhere between a crustless quiche and a Spanish tortilla, Breakfast Egg Cups are a simple make-ahead meal for the morning.  They even freeze well so you can make a double batch for the week.

A lot of us who need to use our brains for anything during the day agree that breakfast must include a lean protein and some tasty low-carb ingredients.  Because you can make them ahead, reheat them in a microwave or pack them for a commute, Breakfast Egg Cups are a pure solution and really nice if portion size or calorie conscious eating is on the menu. 

There are as many filling variations as there are omelette ideas.  If you are really determined about calories this fall, you can substitute all or part of the whole eggs in this recipe with egg whites and stick with vegetables like spinach, zucchini, mushrooms and asparagus and meats like Canadian bacon rather then the higher carb/fat options.  You can use low fat cheeses or cottage/ricotta cheese as well. 

At other times, you might like combinations like potato-chorizo-manchego cheese, asparagus-blue cheese-bacon or smoked gouda-mushroom-sausage. It almost sounds like party fare.  In fact, if you bake a batch in mini-muffin tins rather than the regular muffin pans here, you have a very nice hot hors d’oeuvre for last minutes guests.

Breakfast Egg Cups
Makes 6 cups, one serving equals 2 egg cups
Ingredients
3 eggs
1/4 cup milk
1/4 cup freshly grated Parmesan cheese
3/4 cup cooked chopped vegetables (zucchini, spinach, asparagus, potatoes)
optional: up to 2 tablespoons extra cheese (blue, cheddar, swiss, havarti, smoked gouda, goat cheese) and/or 2 tablespoons cooked diced bacon, chorizo sausage, Canadian bacon

Method
  1. Preheat oven to 350˚F.  Lightly spray muffin tins with oil. (You may use lightly sprayed paper liners.) 
  2. Break eggs into a small mixing bowl and mix well.  
  3. Add remaining ingredients and spoon into 6 muffin tins.  Fill any empty cups 1/4 full with water to prevent burning.)
  4. Bake 15 minutes, until eggs are set.  As with quiche, you can remove them to cook when the centers are still a little loose.
These are easy to take along as is or packed in a warm roll.  

Friday, July 22, 2011

Foraging for Chanterelle Mushrooms

Nothing suits the pure foods mantra like the foods we gather ourselves.  Last week my brother took me to a few of his secret spots in Vermont for chanterelles.  These are the gold-orange mushrooms that look like open parasols from below with gills reaching down the stem.  Not technically gills, but to us amateurs very similar. 

Speaking of amateurs, it’s smart to go mushroom hunting with an expert, preferably a regular forager for the particular mushroom you are searching out.  Matthew has taken me before but I still needed a refresher on identifying them and he checked my basket as we went along.  The more you see them, the easier they are to identify.   Most wooded areas can sustain chanterelles and in Vermont they can pop up seemingly overnight from late spring into September. We had luck at the base of pine and beech trees and along the length of fallen, decomposing trees. 

The forager’s attire and equipment list is short: long plants and shirt to discourage bugs, closed toe shoes to step through the forest’s uneven floor, an optional brimmed hat to protect eyes and face if you like to crash through underbrush, a basket for your finds and a pen knife to cut the stems cleanly. 

At home, Matthew used a dedicated paintbrush to clean our chanterelles.  Now the hard part—to enjoy that evening sautéed in butter over pasta or the next morning in omelettes?  The flavor of a chanterelle is delicate so it pairs well with noodles and eggs.  Don’t be tempted to add many more ingredients or the flavors will overpower your chaterelles.  Potatoes, poultry and seafood also provide a nice match for chanterelles.

Restaurants pay about $20 per pound, nice if you are hitting a gold rush of chanterelles but not a sustainable living.  (Mushrooms are light.)  Still, its nice to know the going rate so you can pat yourself on the back while enjoying a delicacy sought by chefs and diners at multi-star establishments.

Cleaned chanterelles store well in a paper bag in the refrigerator and can be frozen (uncooked) to use within 3 months.  To freeze, lay whole mushrooms on a small baking sheet and place in the freezer.  When mushrooms are frozen, in about 2 hours, place them in a re-sealable plastic bag marked with a use by date.
We decided on open-face chanterelle omelettes with a side of goat cheese.

Friday, May 20, 2011

Pasta Salad


For many of us, getting ready for beach weather means setting limits on carbs without going hungry.  The challenge for the pure-minded is that much so-called diet food uses additives for texture and flavor.  The ensuing sacrifice in flavor and health is off-putting.  Sometimes you need something really hardy between all those salads and this pasta dish makes the cut on both taste and nutrition. 

Even non-whole grain pasta enthusiasts went for this pasta salad made with rotini-shaped pasta that picks up the creamy yet low-cal sauce.  The secret is an ounce of cream cheese. And yes, you can use regular cream cheese and still get the low-cal benefits.  The high ratio of  vegetables to pasta (especially mushrooms) also lowers the calorie count while the whole grain pasta makes it deeply satisfying.

Whole Wheat Pasta Salad
Serves 4, recipe can be doubled

Ingredients
8 ounces whole grain rotini (like Barilla)
8 ounces portabello mushrooms, sliced
1 tablespoon olive oil
8 ounces asparagus, trimmed and chopped in 3-4 sections
2 carrots, peeled and julienned
1 ounce cream cheese
1 tablespoon freshly grated Parmesan cheese
1/4 cup leftover pasta water, low-fat milk or chicken broth to taste
salt & pepper
2 tablespoons fresh basil, chopped (other fresh herbs like tarragon, thyme or dill may be substituted)
  1.  Cook pasta according instructions on package and drain well. (Reserve a small amount of pasta water to use in the sauce.)
  2. While pasta cooks, heat oil in a large skillet over medium-high heat and saute mushrooms.  Remove from pan.
  3. In same skillet, add a 1/2 cup cold water, asparagus and carrots.  Boil over high heat, uncovered until water evaporates and vegetables are crisp-tender.  Cook a little longer with more water if you like your vegetables a bit more tender.  Lower heat to simmer. 
  4. Return mushrooms to skillet and add warm pasta. Stir in cream cheese and Parmesan cheese.  Add pasta water, milk or broth to thin the sauce so that it coats pasta well. 
  5. Sprinkle with chopped herbs and serve immediately or chill to use a cold pasta salad.
This transports very well to a picnic, pot luck or the office.  A serving with a few slices of cooked chicken breast or tofu make a complete lunch. 

While  meant to be a side salad served cold or room temperature, that first night it got gobbled up hot and never got a chance to chill.  The next day I added a little low-fat milk to moisten the leftovers and served it cold alongside sandwiches.

Sunday, November 7, 2010

Calcium Loading

The New York City Marathon is one of the city’s big fall events.  Runners enjoy an annual pasta meal the night before the big race.  Everyone knows its called “carb-loading” and it helps lean marathoners go the distance without depletion. 

There’s another race that more if us are involved in, the slightly longer marathon to maintain strong bones throughout our lives.  While marathoners are carb-loading, you can be calcium-loading. 

Calcium-loading is a mindful approach to getting calcium at as many meals as possible every day.  The body can only absorb about 500 mg of calcium at a time but the recommended daily amount is between 1,000-1,500 mg for most adults.  Taking a calcium supplement is recommended for many women but keeping up with the dosage can be taxing.  Take it all at once and most is lost to the body.  Try to take a pill at every meal and risk forgetting. Healthy bones are too important to neglect so here is a plan to keep calcium flowing through your system via- surprise- food.  Many low fat options make this possible for all but the lactose intolerant.  Add a few of these to your routine on a consistent basis and your doctor may suggest cutting back on the supplements.

There are choices at every meal and snack opportunity:

Breakfast
Coffee Latte—Get you caffeine with a bigger shot of milk and add 33mg calcium for every ounce (regardless of fat content).   I like strong hot coffee with at least 1/3 of the mug filled with milk.  That’s almost 100 mg* and plenty of caffeine.

Hot Chocolate-- Don't feel guilty about a morning hot cocoa.  If you can make it yourself,  it's likely you'll get out the door with less sugar and fewer calories than a coffeehouse special latte.  Hold the marshmallows.

Orange Juice—you can buy calcium-fortified versions but plain is also a contributor at 52 mg. calcium in 4 ounces.

Egg- one large egg contributes 27 mg calcium to your morning.  (Note: over 90% of the calcium is in the yolk.)

Yogurt- dollop it on oatmeal, which itself contributes about 85 mg of calcium in a cup, eat it plain or in a breakfast parfait with fresh or stewed fruit and a handful of low fat granola.   Eight ounces provides from 300-500 mg of calcium  (check the label on your favorite).

Cream cheese- replace butter with an ounce of regular or low fat cream cheese on toast, muffins, rolls and bagels.  Skimp on that huge bagel by cutting it in half but don’t cheat yourself out of the nutrition-rich cheese.   It also delivers a nice quantity of protein, keeping you satisfied through the morning.  One ounce gives you 25+ mg calcium bonus over butter or jams.  Mix in some cinnamon or a teaspoon of maple syrup for a terrific pancake or whole wheat waffle spread. 

Almond butter is a second option on breakfast breads.  It tastes good with cream cheese or on its own.  One tablespoon gives you 43 mg of calcium.

Smoothies made with low fat milk, plain yogurt and fruits including banana as a thickener make a quick breakfast protein shake.  Here’s a seasonal recipe that tastes like pumpkin pie:

Pumpkin Smoothie:
Serves 1

Ingredients
1/2 cup skim milk
1/2 cup plain yogurt
1/3 cup pureed pumpkin (canned is fine
1/2 teaspoon cinnamon
1/4 teaspoon nutmeg
1 teaspoon maple syrup or honey
1/8 teaspoon vanilla extract

Method
  1. Shake all ingredients together in a lidded jar with a few ice cubes or, if doubling the recipe, mix it up in a blender. 

Lunch
Beverage of choice: Milk- your kids are (perhaps) having a glass of milk with their school lunch.  Maybe you should try it too.  Skim milk goes well with a sandwich and adds a big boost of both calcium and protein to your day.

Cheese please- Diet guides often recommend peeling the cheese off a sandwich to lower calories.  Instead, add a slice of your favorite hard cheese and lose a slice of bread to create an open face sandwich.  One ounce of most hard cheese provides between 100-200 mg calcium with only about 100 extra nutrient rich calories. If you can’t get out of your own way on the calories front, enjoy low-calorie versions of cheddar, Swiss and many others.  Melted is really good!

Spinach salad- Toss a cup of baby spinach leaves into your next midday salad and scoop up an extra 30 mg of calcium with just 7 calories. 

And while you’re at the salad bar, reach for chick peas.  You’ll add 43 mg calcium for every half cup (143 calories and 6 grams of protein makes your salad a main dish).

Snacks
Cottage Cheese- Once considered “diet food” only, cottage cheese is still a great side or satisfying snack with melon or pineapple.  Now it’s also used by savvy cooks in dip and baked pasta recipes. 

Cheese, Glorious Cheese- When you snack well it feels satisfying, not hunger-inducing.  An ounce of cheese can get you through to dinner and if you are not serving something with calcium it’s the perfect pre-dinner appetizer or elegant dessert with fruit. At about 100-140 calories per ounce it competes with most energy bars.

Chocolate milk—Com’n, you know you like it.  You can grab one on the go or whip one up at home.  If you are making chocolate milk at home, add a drop of real vanilla extract to enhance the deep chocolate flavor and reduce the amount of sugar needed.

Nuts- One ounce of nuts goes farther than you’d think to curb your appetite and add calcium.   Almonds 75 mg calcium, 1 ounce = 22 nuts, brazilnuts 45 mg calcium, 1 ounce = 6 nuts. Pistachios 31 mg calcium, 1 ounce = 49 nuts, walnuts 28 mg calcium, 1 ounce = 14 nuts.

White beans- two ounces contributes 20 mg calcium.  Mash beans up with a teaspoon of extra virgin olive oil and dried rosemary, salt and pepper to taste.  Celery, carrots, steamed green beans, asparagus, and cauliflower are all calcium-contributing dippers.

Edamame (soy beans) 1 cup =261 mg

Dinner
Many vegetables are a surprising source of calcium.  Half cup of cabbage or bok choy provides 190 mg calcium, broccoli 33 and okra 65 each.  A cup of cooked spinach provides 250 mg calcium and collard greens are at close second at 226 mg per cup serving. 

Go Au Gratin: One ounce of grated Parmesan has 110 calories and a whopping 313 mg calcium.  Cheese and broccoli casserole is suddenly more meaningful.  Try it with a low-fat version of cheddar and a dusting of grated Parmesan.   See below for a fast and freezable broccoli-cheese-rice casserole.  (Even rice has a respectable amount of calcium.)

Cheesy Broccoli Rice Casserole
Serves 4 as a side

Ingredients
2 cups cooked rice
3 cups steamed broccoli
1/2 cup sliced, steamed celery
6 oz vegetable or chicken broth
1 /4 cup lite mayo
2 T sour cream
1/3 cup each grated mozzarella and cheddar
1/2 cup Parmesan, divided

  1. Preheat oven to 350˚.  Spray a large casserole dish with spray oil.  
  2. In a small bowl, slowly whisk mix broth into mayonnaise and sour cream a bit at a time to form a thick sauce.  
  3. Add grated mozzarella and cheddar and half the Parmesan.  Set aside.
  4. Place rice and vegetables in prepared casserole.  
  5. Pour cheese mixture over and toss to combine.  
  6. Cover and bake 20 minutes until heated through.  
  7. Remove cover, sprinkle on remaining Parmesan cheese and bake another 5 minutes until cheese is melted.

Fish like salmon and sardines load on the calcium.  Three ounces give your between 300 and 350 mg calcium.  Finish fish with a sprinkling of sesame seeds.  12 grams provides 80 mg, calcium.  (Make your favorite tuna recipe with canned salmon to boost mid-day calcium. A three ounce serving of canned salmon packs 234 mg calcium.

Tofu, made from soy beans, is another way to add calcium.  A 4oz serving provides 150 mg calcium.  See if it’s in your favorite veggie burger. 

Not just for baked potatoes, dairy toppings can garnish steamed or roasted vegetables and thick soups.  Choose Greek yogurt, “yogurt cheese” or sour cream.  (To make yogurt cheese, drain a cup of plain yogurt in cheesecloth or a coffee filter for a few hours or overnight over a shallow bowl.)

Dessert
Puddings made with low fat and skim milk are a lovely treat every once in a while.  Chocolate pudding, vanilla pudding, rice pudding, tapioca can be made from scratch but are also available in low fat versions already prepared.

Yogurt—yes, for dessert.  We use it on fruit crisps instead of ice cream or whipped cream.  Try the plain, whole milk type (some brands have cream on top).  It is the perfect foil to sweet crisps. 

Close out a meal with a cheese and fruit platter or serve as a side to a soup meal.  Add some calcium-rich nuts like almonds to the platter too.  Keep cheese plates simple and portions in control.  An ounce of cheese is usually equivalent to the size of 3 dice.

The Cheese Plate  (calcium in one ounce)
Cheese          Calcium     Calories
Gouda              196           100
Fontina            154           109
Brie                   51             94
Cheddar          202            113
Goat Cheese      83           102
Swiss               221           106
Roquefort        185           103
Feta                 138             74

*Calcium content noted sourced from http://nutritiondata.self.com/

Vitamin D
Your body requires a supply of Vitamin D to help your system absorb and regulate calcium.  There are not many sources (fatty fish, meat and eggs).  One source is sunlight and it only takes 10-15 outdoors daily with face and arms exposed (no sunscreen) to obtain your fill. (A daily walk outside is another important bone strengthener.) Those who live in colder climates or who cannot be without sunscreen for that length of time can also get Vitamin D via fortified foods.

Sunday, March 28, 2010

The Last Winter Squash

Last fall I stored a nice fall crop from the farmer’s market in our makeshift root cellar, a covered open-weave basket stored in a cool dry room.   Looking back from the end of March, we’ve  enjoyed roasted Brussels sprouts, sweet potatoes stewed with black beans and chilies, butternut squash gratin with rosemary and acorn squash split and roasted with maple butter.  Our local farmers market will be reopening soon and there’s just one thing left, a turban squash.   We’ll need one last recipe….

Turban squash get its name from its hat like shape and fashionable striations.  Ours is predominantly green but you’ll see them with orange and yellow accents too.  It’s a mild squash with a slightly sweet flavor that can be boiled or baked.  It goes well with chicken, pork, lamb and even shrimp and grains.  We roasted it and served it with short grain brown rice.  With a sprinkling of Parmesan cheese, it reminded us of a short cut risotto.  The leftovers were mixed with diced mozzarella cheese and piled into halved red peppers and baked.   

Roasted Turban Squash
1 turbon squash (butternut may also be used)
1 tablespoon olive oil
1/2 teaspoon dried thyme
salt and pepper

Preheat oven to 425˚F.  Cut skin away from squash with a sharp knife.  Cut peeled squash in half and scoop out seeds at center.  Cut squash into bite sized pieces and place in a oven safe casserole dish (or for a small squash a glass pie plate).  Add remaining ingredients and toss well.  Roast, uncovered, for 40-45 minutes until squash is tender and a fork pierces the flesh easily.  Serve over cooked brown rice.
Note: Any brown rice is terrific with winter squash.  I used Lundberg's short grain brown rice for these dishes.

Roasted Squash and Rice Stuffed Peppers
Serves 2 as a side, 1 as a main course
1 red pepper
1 cup cooked winter squash
1 cup cooked brown rice
1 oz mozzarella cheese
1 tablespoon freshly grated Parmesan cheese

Preheat oven to 350˚F.  Line a small baking pan with tin foil and lightly spray with oil.  Cut red pepper in half lengthwise and remove stem and seeds.  You do not need to pre-bake the peppers.  Dice mozzarella cheese.  In a small bowl combine cheese with  squash and rice.  Cut squash into smaller pieces if too large for the peppers.  Divide mixture in half and fill each pepper half.  Sprinkle with grated Parmesan cheese and bake 40 minutes until peppers are tender and cheese is slightly browned on top.

Winter may not be hard to say good-bye to but local winter squash will be missed, until next year.

Monday, March 22, 2010

Breakfast of Pure Champions

Switch out a few things to purify your breakfast habits and you will feel it around your waistline and around 10am when your energy reserves are still there for you.     

Lunch for Breakfast   
Many Americans consume over half of their daily sugar quotient by 9am.  Cereal, toaster cakes and tarts, energy bars and functional drinks provide a quick meal that promises to jump start the day but by mid-morning our bodies are wondering when the next sugar hit is coming.  The front of the box says its wholesome but you know you should be reading the label on the back to get the full picture.  Still, this is what we see in the grocery aisle marked breakfast so it’s got to be good for us, right?

Instead of sitting down to dessert every morning, try something really revolutionary: lunch.  Widen your idea of what a breakfast sandwiches can be.   A ham sandwich on rye, turkey on whole wheat,  peanut butter and bananas on multi-grain toast, grilled cheese with tomatoes, avocado or red peppers can all qualify as breakfast. They are fast, portable and will give you more staying power through morning meetings and classes.  If you like eggs but don’t have time to scramble some in the morning, scoop some pre-made egg salad or sliced hard boiled eggs and sliced tomatoes on a hard roll and head out the door.

With a few extra minutes you can assemble a mini whole wheat pita pocket filled with Canadian bacon, a fried egg or egg white and an ounce of cheddar cheese.  This is a first class treat and packed with long-lasting, valuable foods.  You can make a batch of these and freeze them individually in aluminum foil for a toaster-oven breakfast sandwich ready in minutes. My mother taught me to make open-faced Swiss cheese melts over grilled mushrooms and rye toast.  Sauté extra mushrooms tonight and have a fast elegant breakfast tomorrow.  What do all of these sandwiches have in common?   Some protein with a whole grain carbohydrate.  Some even pack in a little dairy.  That and the fact that you can pronounce every ingredient in your breakfast.

Blender Breakfasts
Energy drinks are easy to grab on the go from convenience stores and vending machines but did you know that low fat milk (also widely available) has the perfect balance of protein and carbs for replenishment?  Just make sure you get the real thing, not an enhanced version (which generally means added sugar).  You can also get serious benefits from downing a, 8-ounce shot of low-fat chocolate milk.  For those with bigger ambitions and a blender try these quick morning smoothies:

For chocoholics, a Chocolate Monkey smoothie….
Thank the banana for no added sugar and a nice dose of potassium.
6 oz low-fat or non-fat milk
1 small ripe banana, cut in chunks )try a frozen one)
1 teaspoon cocoa powder
1/2 teaspoon cinnamon
1/4 teaspoon vanilla extract
Add half the milk and the banana to the blender and mix on low until the banana is smooth.  Add remaining ingredients. 


For fruit lovers, a Freezer Fruit smoothie is available year round.  Because the fruit is frozen it thickens the shake naturally. 
6 oz low-fat or non-fat milk
4 oz fruit juice (orange juice, pineapple, pomegranate, cranberry)
1 cup frozen fruit: mangos, peaches, berries, any combo
2 teaspoons honey
1/4 teaspoon almond or vanilla extract
Blend all ingredients together first on low, then for a few seconds on high to get a frothy mixture.

Toasties
Think your toaster strudel is doing the trick? Sure, it’s fast and satisfies a sweet tooth’s craving for energy but you could do better.  Try a fruit and cream cheese burrito with a cinnamon spiked all-fruit spread.  You’ll get an immediate lift plus more long lasting back-up ingredients.   Assemble the night before and heat it in the toaster oven or eat it straight from the fridge. 

Toasted Fruit Burrito
1 whole wheat tortilla
1 ounce cream cheese or ricotta cheese (heaping tablespoon)
1/8 teaspoon cinnamon
Dash vanilla extract
1/2 sliced fruit of your choice—peaches, pears, mango, baked apple, berries, etc
1 tablespoon jam or all-fruit spread- any flavor

Spread the jam on tortilla, leaving a two inch edge.  Next spread a layer of cream cheese or ricotta cheese over jam.  Pile fruit down center of tortilla, leaving edges clear.  Roll tortilla into a burrito by folding the bottom edge over the fruit. Fold the sides over perpendicular to that edge and close burrito by bringing top flap over the three folded edges.  Refrigerate overnight and take it on the road or heat in a toaster oven until the tortilla is crisped and the filling is warm.  Enjoy.

Have Your Bagel and Eat It Too
Have you noticed things getting larger?  The average size of a bagel has almost doubled.  Cut you bagel in half and slather on a full ounce of low fat cream cheese.  It’s the cream cheese that is holding the bagel and you together for the morning not the excess bread.  An ounce of low fat cream cheese has 2 grams of protein, 4% of your calcium requirements and about 55 calories.  If you choose a (normal-sized) bagel with some whole grains you can add in another 6-7 grams of protein.

Speaking of protein, take a road trip to England or South America where beans are on the breakfast menu.  Baked beans on toast and black beans on a corn tortilla both pack a wallop of protein and taste great plain or with a poached egg on top. 

94% say breakfast is most important meal but only 43% eat breakfast…

Many dieters make calorie cuts at breakfast.  Turn this idea on its head today.  Instead of trimming the life out of the early part of your day, feed your body and supply it with what it needs to get through the day. It’s much more fun to add up then cut back when it comes to calorie counting. By ensuring you have enough energy and nutrition reserves at the start of the day you will not be tempted to overeat at lunch and during the afternoon.  I aim for at least 300-350 calories in real foods by 10 am every day.

Dessert- The End
Enjoy cereal but put it in its proper place: dessert.  Serve it after dinner with milk and dried fruit (try warm milk).  Crunch it up on top of fresh fruit and bake it to make a cereal fruit crisp and add ice cream or frozen yogurt.  Layer it into a parfait-to-go with plain yogurt and berries as an after school snack.  And when the box is empty, take a fresh look at the cereal aisle and in the natural food section of your grocery store for something with less sugar to try in desserts next month.

Thursday, March 11, 2010

Chicken Nachos

Nachos have fallen rather low on the nation’s culinary respect scale.   Now consumed mindlessly at movie theaters and bars while gazing off at a screen or spilled out of paper containers at a ball game, nachos were once a treat made with real ingredients like freshly grated cheese, fresh tortilla chips and a salad of toppings.

If this is a distant memory, try making your own for a fun lunch of light dinner.  Yes, they make appetizers that everyone loves too, but these are so good you may not get one so have your own private nacho fest.  These are light and healthy and easy enough to make every week. 

You can sift through a bag of chips for unbroken ones to make nachos, but making your own tortilla chips is easy and a good way to get a sense of portion size. We make baked tortilla chips from corn tortillas.  They taste like restaurant ones, warm and toasty.  The fact that they are cheap and it keeps bags of chips out of sight and out of mind are bonuses. 

Now that you know you are starting with a corn tortilla, figure out how many you’d normally eat if you were making tacos for lunch.   For me two is about right. Using a pizza cutter, cut each tortilla into 6 wedges.  Nachos for two uses 4 tortillas cut into 24 wedges.   (I won’t argue if you use three per person but try it with less than you think.  The complex carbohydrates and protein toppings are filling and satisfying.) 

Lay the wedges on a tin foil lined baking sheet and spray lightly with spray oil. Turn the wedges over and repeat with a light coating of oil.  (Hold the oil at least 10 inches from the chips to get a light even coating.)  Place the chips in a 450˚F oven for 6-7 minutes.  Turn chips over with tongs and continue to cook another 6-7 minutes.  Chips are ready when they begin to crisp and can be bitten into cleanly.  They will still be a little flexible in the center.   Now pile on the toppings:

1 cup cooked shredded chicken breast
1/4 cup sliced back olives
1 tablespoon pickled jalepeño slices
3 oz shredded cheddar cheese

Scoop a few teaspoons of chicken on each chip, top with olives slices and a jalepeño chip.  Give each nacho a thin layer of cheese.  Put the tray of nachos back in the oven (still at 450˚F) and cook until chicken is hot and cheese is melted. 

These are great plain or with a drop of hot sauce (we like Cholula) and chopped fresh cilantro.  Good balancers will enjoy a bit of salsa, sour cream (or Greek yogurt), shredded lettuce and a small slice of avocado. 

Vegetarian readers have already figured out that they can have plain cheese nachos or substitute rinsed canned black beans for the chicken.  Chicken nachos and bean-and-cheese nachos make a nice combo platter.